
Trinity Stitch Beanie
*with optional pom-pom*
Trinity Stitch Beanie
*with optional pom-pom*
Materials:*1 skein worsted weight yarn (I use Hobby Lobbys I Love This Yarn!)
if doing the contrasting band 2 skeins in the colors you choose
* I hook and a K hook
* A large eye yarn needle for weaving in ends
*Pom-pom maker (homemade maker works well here too, I use a homemade on roughly 4.5 inches across)
*scissors
*a smileeeeeeee :)
Stitch Explanation:
Sc:Single crochet
Ts:Trinity stitch as follows...chain 1, insert hook into same stitch and pull up a loop, insert hook into next stitch and pull up a loop x2, yarn over and pull through all 4 loops on the hook
Because I am new to pattern writing and because some of my personal techniques may be different than traditional methods of crochet I have included painfully detailed photographic instruction. This is to ensure we are “on the same page” with our stitches and to help new crocheters, or those new to this stitch, be successful ….
A video tutorial on this hat can be found here on You Tube :)
Please join me over in a new facebook group called Crochet Supernova .....
Now smile and grab your yarn and hook :) Let's have some fun!!!!!
The band:

With your I hook and your band color chain 9
Row 1: insert hook in the 2nd chain from the hook and sc all the way across, ch 1 turn

Row 2: insert hook in back loop only and sc across all (8 sc st)


Repeat row 2 until you have a total of 62 rib rows making up the band.
Chain 1 and turn on side single chain in each stitch across the LENGTH of the band until you reach the final stitch.

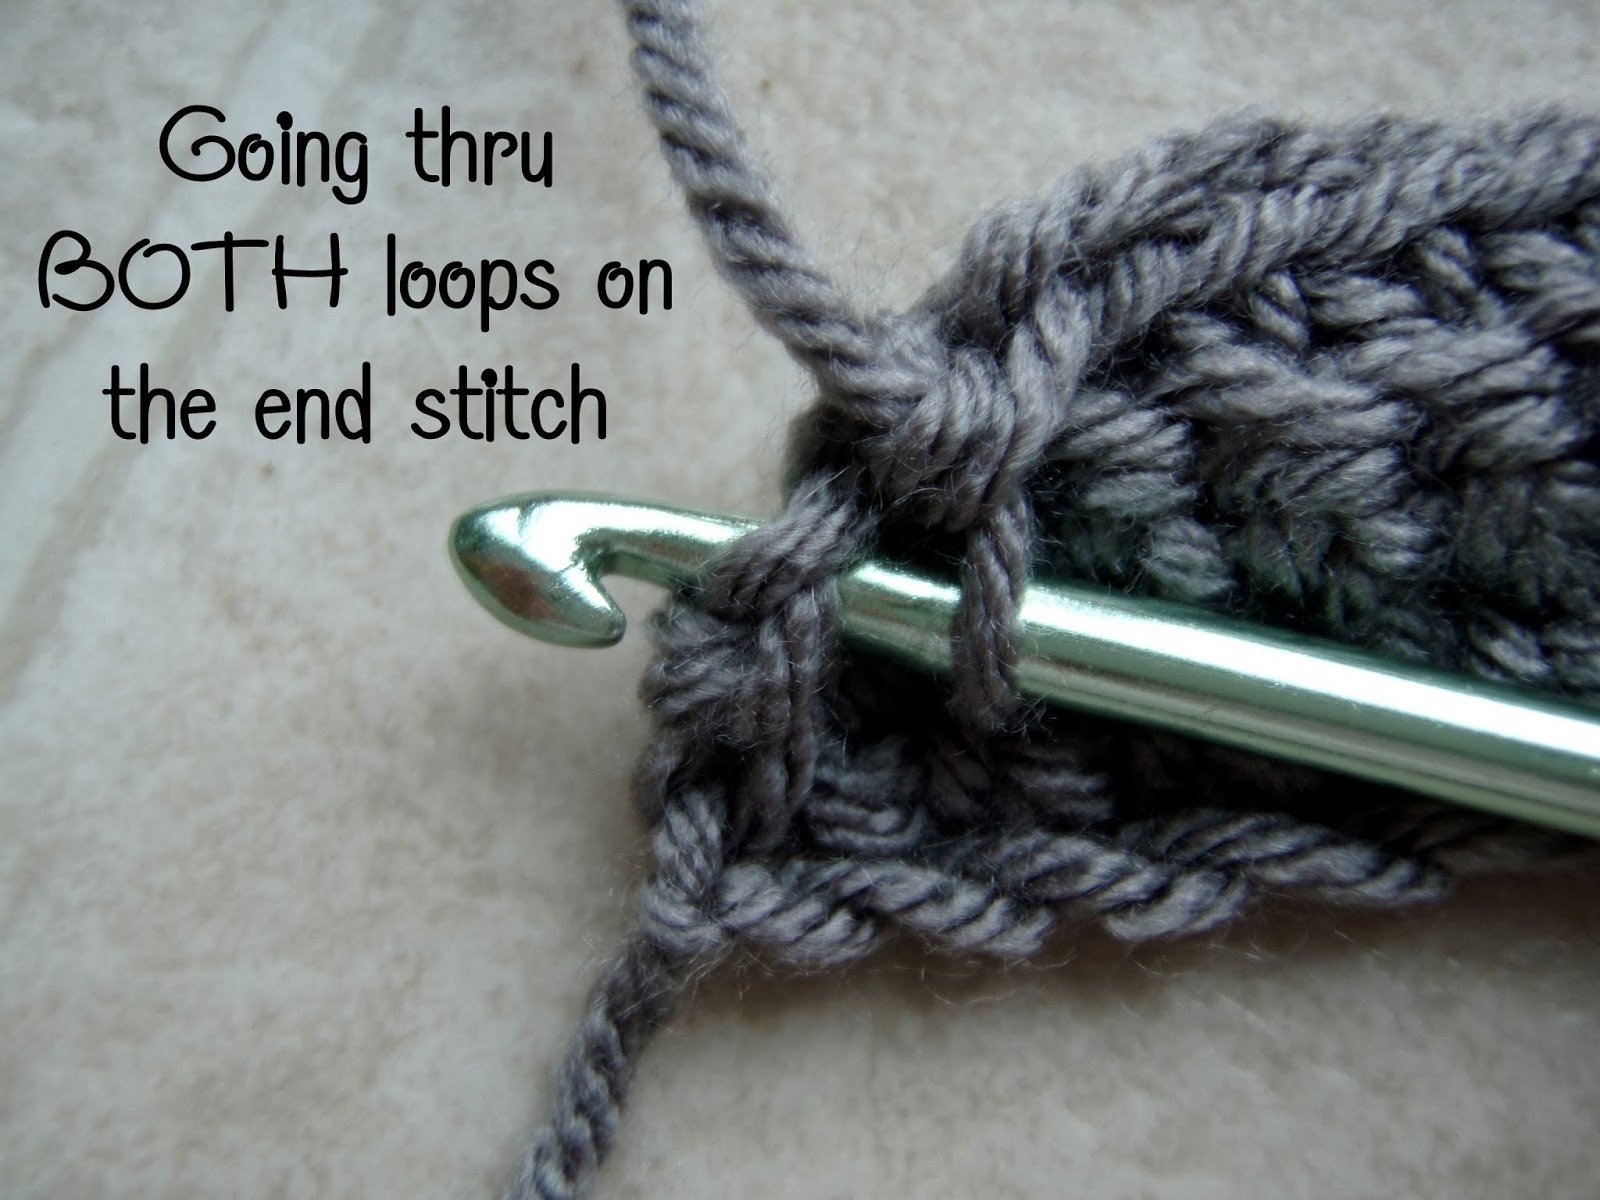
Bring band around joining the ends. Inset hook into last stitch going through the last row and first row of the band at the same time. Draw up a loop and sc through BOTH joining the two ends forming the band circle.

(I have switched yarn colors for the body of the hat so this is the time to do that as well if you care to, or simply continue in the band color)

Chain 1 do not turn.
Note: Switch to your K hook here

Here is where you will begin your trinity stitch. Begin working in the round.

 Trinity Stitch in each sc around ending at he beginning with your last stitch ending in the first stitch of the beginning trinity stitch. DO NOT CHAIN just continue working in the round working in the stitches of the trinity stitches in the previous row.
Work the trinity stitch for 12 rounds


Decreasing the hat:
When you reach 12 trinity stitches high, or twelve rounds, begin to decrease the trinity stitch 4 stitches at a time. Do four normal trinities, then work a decrease as follows:
 Begin stitch as normal going into stitch just worked, skip next two stitches and go into 3rdst (this will be the top of a trinity cluster)and continue to work the stitch as normal pulling up a loop, inserting into the next stitch and pulling up a loop, yarn over and pull through all 4 loops, chain 1. Continue with 4 normal trinities, one decrease trinity stitch until you have roughly 35 or so chain spaces left , or about a palm sized opening left in the top of the hat. Sc in each stitch around, fasten off with an 8 inch tail for closing the hole.
Weave in and out of the sc in the top of the hat with your yarn needle, draw up tight with needle on the inside of the hat and tie off snugly weaving in end.
Use long tail left on the band of the hat to join the seam from the inside of the hat. Tie off snugly, weave in ends.
Using your pom pom maker make a super fun and fluffy pom. Attach FIRMLY to top of hat tying long ends on inside and weaving in tails.
Smile and relax! You've just finished your super cute new hat...... enjoy!

Next up the Trinity Scarf Pattern......
I just love your tutorials...Thanks so much, and can't wait for the trinity scarf tutorial. :)
ReplyDeleteNeeds more details
DeleteIts actually written with more details then most patterns & the fact that this pattern is free and so detailed makes it even better then paid patterns
DeleteYhao, not only a professional knitting manufacturer but also a famous sock brand founded in China in 2004. Yhao symbolizes luck, “Meet Yhao, Meet Your Happiness” is Yhao’s beautiful blessing to everyone. custom pom pom beanies
DeleteWe produce custom socks, I have recently been fascinated by knitting technology, this article is great
DeleteI love this pattern. Thanks for sharing.
ReplyDeleteKaite socks, One-stop socks & packaging production customized Sock Manufacturer, more than ten years of experience wholesale socks manufacturers in China.
DeleteThanks so much for sharing! As I am a beginner I hope I can make one :)
ReplyDeleteThis is much harder than custom socks. I will try it too. When I succeed, I will come back.
DeleteThank you!
ReplyDeleteLovely pattern,many thanks. Can't see how many colours used though?
ReplyDelete:) in the top photo it was one striped yarn and for the band a solid..... the hat can be done all in a stripe from beginning to end or all in a solid also.....
DeleteAfter the first row are we supposed to work into the chains too or just the top of the trinity stitch?
ReplyDeletein the chains too.... it works up just like the first row..... :)
DeleteThank you :) I had to alter my hat a little bit cause it was WAYYY too long! Lol I looked like the kid from the fat albert cartoon! But now it fits just perfect :) Me, my cousin AND her husband all made one!
DeleteIm so happy you all made one :) its like having lil hat babies all over the world makes me so happpppyyyy! I should prolly try to figure out how to do a gauge thing? Gahhh Im new to writing patterns soooooo much to learn.
DeleteI love this pattern, but as I was trying to crochet one last night, I realize if you are working in 3 stitches and only leaving behind 2 st.s aren't you decreasing as you go? I am a beginner, and rarely work with patterns, so I'm sure I've done something wrong lol
ReplyDeleteThat's a great question :) when you do the trinity st you are actually only ever using two st...... you are going directly into one st that you already used (step1) then drawing up two more loops over the next two st..... so the first doesn't count, and only the two you went into next. If you didn't add the chain 1 you would be decreasing by one each time .... I hope I explained that ok.... :)
DeleteLooooove this pattern! I'm destinys cousin...above! My husband is on his second one now! Thanks so much for sharing the pattern with us! I can't wait for the matching scarf and wristlets.... oh I'm so excited! Its really cold now where we are, so this is just perfect
ReplyDeleteHow cool is that???? I love that you guys are having fun with it :) This makes me smile sooooo much <3 Im writing the scarf up today, and the wristers are very very basic so those should be super easy to write up soon too.... with seven kids sometimes I cant get to all the tech stuff as soon as I think I can but today nothing is stopping me on the scarf at least lol....
DeleteAwesomesauce! Can't wait! Thanks so much again for this great pattern
DeleteLove your patterns....however think I'm over thinking the joining of the band. I have done the sc around the length of the band and attempting to join - do you join down the length of the band? If I join the 1st stitch to the last what about the other stitches down the width of the band?
ReplyDeleteHi :) you kmow that's a really great question .... you work the length and join in that top stitch to make it "in the round".... but yeah, while you are working the hat its just left unstitched at the band there.... you use your long tail when you are all done and stitch the seam up and weave in ur ends and its all good to go :) You seem like ur right on track with the hat, so just join, then work the trinity body and when ur all done whip that lil seam up and you have ur super fun new beanie <3
DeleteLooking forward to making this for myself. Quick question do you have any adjustments for infants/ toddlers? I have an almost 2 year old ( 19 inch head ) and a 2 month old ( 15 inch head ) and wanted to make them one each, I figure id need to change the start rows and have less rounds but would I need a certain multiple of sts for the decreases? Thought id ask before I attempt as you know the pattern well as you wrote it :)
ReplyDeleteI thought about that too.... I do make them for smaller wee ones, heres what I do.... firstly the st is a multiple of two thing.... so what ever u decide on your band just make sure its an even number.... I also decrease the width of the band instead of starting w 9 chains (8st) I go like 6 ch(5st) so its not so wide... you can even go more tiny for smaller peanuts :)
DeleteHi..I'm working on this hat and I have a question, I've worked the first row of trinity stitches and I'm about to start row 2. I'm confused on where I place my hook to do the stitches. Am I going into the chain one spaces only or going in between the trinity stitches and chain 1 spaces. When I go into the chain one spaces only,, it's decreasing the hat and its not right. please help.
ReplyDeleteHi :) Well you start your second round by using all ch sp...... I hope I can explain this right bare with me..... you see the trinity st? there is the lil st that sits right on top (ur ch 1 after pulling in thru all the loops..... thats going to be where you pull up your SECOND loop.... this keeps them right on top of eachother in a sweet lil line ;) so insert hook in st right in front of top of trinity, pull up a loop(2 loops on hook). insert into st on TOP of trinity and pull up a loop (3 loops on hook) and hen insert into next st rightafter the trinity and draw up a loop (4 st on hook) yarn over pull thru all 4 and ch 1...... :)
Deletegahhhh not meaning all the "ch spaces* ... meaning all the spaces including the ch 1 spaces .....
Deleteok...ill try it and let you know what happens....lol thx
DeleteHi!!! Love this pattern, and your daughter is beautiful! :) I saw your reply above about how to make the hat smaller, but I'm wondering what size head this fits as written, so I know if I need to make changes for it to fit. My nine year old daughter wants one, I'm just not sure if I need to make it as written or smaller. Thanks so much for sharing your pattern!
ReplyDelete:) ty <3 well I actually made one for my 9 year old girl as well so thats a great question..... I used the same 62 rows of rib but instead of ch 9 and going with 8 for the rib I ch 7 and went with 6 for the rib rows..... that made the band skinnier.... as far as the height I went with about6 inches (including the band) before I decreased I hope ythis helps <3
DeleteThanks so much for your quick reply. I will try that. Her head measures 21" around. I just didn't want to make it too loose. Hopefully it will come out ok!
DeleteIt worked!!!! thx
ReplyDeleteIm so happy :) <3
DeleteIt's me again! Lol I just finished my second beanie and I love it!! :) I just had a tip for closing the hole. After doing the sc at the end i went around one more time with sc and skipped every other stitch. It made the hole even smaller and made it easier to close! :)
ReplyDeleteis the yarn you used called "Agean" by Hobby Lobby's I Love This Yarn Stripes Yarn? I love the colors! Its so pretty. I want to get exact same color! :)
ReplyDeleteYes it is! Great eye ;) Im madly in love with hobby lobbys I Love This Yarn line .... so soft and the colors are so fun :)
DeleteI would like to say I love your tutorial, though it is hard to use when I can't sit at my computer while working.. For some reason my kindle will not load the page, though I think that is my device, not your page. So, with that being said, do you have a link to just the written pattern I could follow?? I love this hat and want to make matching ones for me and my daughters!
ReplyDeleteUnfortunately I dont have just the pattern written out :(
DeleteMy new favorite pattern!!! Thank you for the fast and easy pattern.
ReplyDeleteLove this and made one that fits me perfectly! If I wanted to make it larger, for my husband would I just increase the size of the band or use a larger needle? Thanks so much for sharing!
ReplyDeleteIm so happy it worked out so well for you :) I think I would add 2 more rows to the band and then just continue the pattern as normal.... its a mult 2 pattern, so any increases will work as long as they are by 2 :) Hope this helps
DeleteAfter 3 rounds of the trinity stitch, the body of the hat is wider than the band. Am I doing something wrong?
ReplyDeleteThank you!
:) Nope u arent ....... it does kind of appear that way until u decrease .... as long as your tension is consistent it should all be ok...... if u feel after doing a test fit a few rows in that its too large for you, you can try the next size down hook, however truly it does look a lil like its flowering out until the decrease..... hope this helps :)
DeleteHi on the band part can u do like a fpdc/bpdc or a fpsc/fpsc for 62 rows
ReplyDeleteHi :) you know I dont see why not :) It would be very pretty I would think.... Just make sure the correct number (multi of 2) is there for you to start the body .... I say go for it, make it your own :)
DeleteHi, I wanted to thank you so much for this pattern and to tell you what I have been doing with it, I make hats for children in my local foster program and I make scarves using the trinity stitch for the homeless. They work up quickly and look just wonderful for men or women and kids too. I have had so much fun doing this and I wanted you to know that your creativity is being used for a couple of great causes. Thank you so much, Terri C.
ReplyDeleteThank you so much for this pattern, it really is fun to do and turns out so pretty. Thank you for the video's too, they helped understand the stitch. :)
ReplyDeleteCan't wait to try this! Thanks!
ReplyDeleteWow u do great instructions thank you
ReplyDeleteThis is one of the best--and most beautiful--tutorials ever. I am picking up my crochet hooks NOW. Thank you so much for sharing!
ReplyDeleteI need help!
ReplyDeleteHow do you crochet the band?
I can crochet but I just don't understand the pattern
Do I sc round 1 and do all the other rows back loop only?
And do I need to sc the first and last one or only the last one?
And ch1 at every end of the row?
Please help me answer the questions, I know I'm complicated <3
You SC row 1, and then BACK LOOP ONLY the rest of the rows until you're finished with the length of the band. when making corners, you want to make all those back loop stitches (count 8), and then yes chain one, flip,then go into the 2ND stitch. If you dont chain one, and/or go into the 1st stitch, the corners will be round and off, and not correct corners
DeleteLove your hat! Where did you get your yarn and who makes it?
ReplyDeleteThank you....I Love it! I've already made several for family and friends. The tutorial was awesome!
ReplyDeleteSince skeins come in different sizes, what size (ounces or yards) do you need to make this?
ReplyDeleteLove the pattern. How can I print it? I do better with written instructions.
ReplyDeleteI added a second band and stitched it over top of the first to make it like a rolled up cuff.
ReplyDeleteHi! I love this hat and the pattern is pretty easy to follow!! I'm a little confused on how to decrease the stitch though. I understand every 5th stitch is a decrease, but how many loops should I be pulling through?
ReplyDeleteI am curious how you count your rows? I made one hat already. I am making this pattern to send to the homeless people in New York City for this winter. Do i count each crocheted row or just the ribs on one side?
ReplyDeleteI am curious how you count your rows? I made one hat already. I am making this pattern to send to the homeless people in New York City for this winter. Do i count each crocheted row or just the ribs on one side?
ReplyDeleteHow do you wear a beanie?
ReplyDeletehttp://delusionmfg.com/collections/blank-beanie-hats
I love the pattern, but why is it hard to go into that chain one stitch on top of the trinity stitch, you make it look so easy on the tutorial. Thanks
ReplyDeleteI love the hat pattern and can't wait to get started on the wristers and scarf. Good job with the directions.
ReplyDeleteHey, I am in love with this pattern!!! I am having trouble figuring how many extra ribs I need to make to have the count come out evenly. The 62 ribs are quite tight on my head. Any suggestions?
ReplyDeleteThis is a brilliant writing and very pleased to find this site. I couldn’t discover to much different information on your blog. I will surely be back again to look at some other important posts that you have in future.
ReplyDeleteluxury bath towel sets
When making the initial band, I have to make mine a bit bigger (than 62 rows), so do I have to end on an even number or something like that? Does the number of rows affect the rest of the hat?
ReplyDeleteYour directions are not correct. I tried your steps and the hat was getting too small. Looked for other directions and see the step needed is that the last stitch of the trinity stitch is the second loop (the first one is on the hook)and then the next two chains are the third and fourth loop. You always go back to the last stitch and start next stitch there. Hope this helps.
ReplyDeleteHow many sc do you do after you finish the brim?
ReplyDeleteI am doing the decrease part. And I'm not quite sure what you mean by working in the Stitch I just worked. Not too mention I need four loops on my hook and am only getting three with all this skipping ...
ReplyDeleteI've made this hat twice so far and I ran into 2 issues. 1. The rim is loose and stretched 2.the head part is too short.(meaning when you wear the hat it barely reaches to your eyebrows.ive used two different types of yarn.
ReplyDeleteCan't you just keep making more rows of the trinity stitches before you start decreasing? And for your brim, just make fewer rows of the SC in back loop.
DeleteI use a smaller hook for my ribbed hat bands, almost always an H and about 19-20" long. Then sc the amount suggested evenly spaced around the rim. For overall height I crochet the pattern until about an inch and half more is needed, then do the decrease. I've made several with this pattern and LOVE it. Just make sure to keep checking your measurements as you go.
DeleteI want to make this as a messy bun hat. Would you suggest finishing as directed and just not cinching up the top?
ReplyDeleteLovely.......loved your way to give tutorial.....impressive
ReplyDeleteWhere can I find the wristlets pattern please
ReplyDeleteThe Pakistani Escorts entire fulfillment of our customers is our need. We select our Karachi escorts girls dependent on strict criteria; each our Pakistani girl make ideal buddy for a man.
ReplyDeleteThank you....I Love it! I've already made several for family and friends.Luxon The tutorial was awesome!
ReplyDeleteI’ve been trying to just make a band for the hat. I keep losing a stitch every once in a while and I can’t figure out what it is I’m doing wrong. Any suggestions?
ReplyDelete大圍開鎖
ReplyDelete大埔開鎖
24小時開鎖
24小時開鎖
換鎖
The Trinity Hat Beanie, with its adaptable design, is a wonderful addition to anyone's winter wardrobe. How Game Play Its versatility allows for personal style expression, whether worn with or without accessories.
ReplyDeleteI love this hat pattern! It's so simple yet stylish, and I really appreciate how clearly you explained everything. Thank you for sharing such a fun and cozy project!
ReplyDeleteReliable Assignment Help can make managing academic tasks much easier when you’re dealing with multiple subjects and tight deadlines. Expert guidance can assist you in understanding complex topics, organizing your work, and improving your writing or analytical skills. Rather than completing the assignments for you, quality support focuses on explanations, feedback, and skill development. This approach helps you maintain academic integrity while building confidence in your abilities. With the right support, assignments become more manageable and less stressful.
ReplyDelete